
Step 1
Create a new file. Set Width and Height to 900×900 at 72 PPI Resolution. Now create a new group and name it Player Shape or Body, inside that group create a new layer.

Step 2
Now using the Rounded Rectangle Tool (U) set the radius to 50 px, color to #363636 and create a shape similar to the one showed in the image below.

Step 3
Using the Rectangular Marquee Tool (M) make a selection starting a few pixels away from the left side and continue it over the right side. Make sure to include the whole shape, exactly like in the image below.
Now go to the option bar under the Layers and click on the Add Layer Mask icon.
Now go to the option bar under the Layers and click on the Add Layer Mask icon.

Step 4
Now to apply some Layer Styles. Right click the shape layer and go to Blending Options. Now use the exact values that I’ve used, or you can play around. The Pattern can be
found on the Tutorial Assets list or inside the PSD.
found on the Tutorial Assets list or inside the PSD.

Step 5
Adding some effects to the layer shape. Create a new layer above this layer vector shape, right click it and select Create Clipping Mask. This will only show parts of the layer inside the shape of the vector shape layer. Now fill the layer with white #fffff using Paint Bucket Tool (G). Go to Filter > Noise > Add Noise and set the Amount to 400%, Distribution to Gaussian and check the Monochromatic box. After go to Filter > Blur > Motion Blur and set the Angle to 0 and Distance to 32 pixels.

Step 6
Step 6 will help create some shadows on the layer. Create a new layer, right click it and select Create Clipping Mask than select a color, I used #363636, a dark grey.
Select Brush Tool (B), set the size to 180 pixels, Hardness to 0 and select Soft Round Pressure Opacity Brush. Start brushing at the end of both sides of the shape, and now
set the blending mode for the layer to Multiply and the Opacity to 23%.
Select Brush Tool (B), set the size to 180 pixels, Hardness to 0 and select Soft Round Pressure Opacity Brush. Start brushing at the end of both sides of the shape, and now
set the blending mode for the layer to Multiply and the Opacity to 23%.

Step 7
Using Rounded Rectangle Tool (U) set the color to #00000 (this being black) and the radius to 50 pixels and create a shape like mine. Now apply some
Drop Shadow effect by following the values and selecting the white color #fffff
Drop Shadow effect by following the values and selecting the white color #fffff

Step 8
Select the Rectangle Tool (U) and create a rectangle over the beginning of the previous shape. Change color to #f24e47 and apply a Pattern Overlay using the Club Pattern that can be found in the Pattern archive included in the Tutorial Assets, follow the settings and after right click on the layer and select Create Clipping Mask. This will mask the layer that we’ve been working inside the shape of the layer beneath.

Step 9
On the right end of the previous shape using Ellipse Tool (U) create a small circle, set the Fill to 0% and apply the following effects seen in the example.
The color used with the Stroke is #e1ddde.
The color used with the Stroke is #e1ddde.

Step 10
Now let’s make the buttons. We will have to do 3 buttons, but the other 2 are the same as the one we’re about to work on. Create a new group and name it Play Button. We will work inside this group now. Using Ellipse Tool (U) Make a black circle at half the size of the shape of the player. Follow the Blending Options and reduce the Opacity to 70%.

Step 11
Using Pen Tool (P) Create a triangle above the circle, set the color to #f24e47 and right click on the layer to select Create Clipping Mask.

Step 12
Make another small circle over the previous one, center it than create a Gradient Overlay like in the example.

Step 13
In this step we will be adding one effect I call radial metal effect. It is a very easy effect to make. Create a new layer, fill it with any color, after go to Filter > Noise > Add Noise and set the Amount to 400%, Distribution to Gaussian and check the Monochromatic box. Next step is to go to Filter > Blur > Radial Blur and set the Amount to 80, Blur Method to Spin and Quality to Good. Now reduce the Opacity of the layer to 12%, center the layer inside the circle so you get the tip of the vortex in the middle of the circle, right click it and select Create Clipping Mask. Name this layer Radial Metal effect.

Step 14
Using Pen Tool (P) make a shape similar to mine over the last circle. Set the color to black #00000. Now go to Filter > Blur > Gaussian Blur and set the Radius to 2 pixels and the Opacity of the layer to 12%. Right click on the layer and select Create Clipping Mask.

Step 15
Duplicate this last layer, put the Opacity to 100%, rotate it a bit and go to Image > Adjustments > Invert. If needed right click on it and select Create Clipping Mask.

Step 16
Once again Pen Tool (P) comes in hour help. Draw 3 triangles this time on the same layer. One black, one white and another black one. Select the 3 layers and merge them. Than go to Filter > Blur > Radial Blur and apply the same value to the radius as in step 14. Don’t forget to transform the existing layer into a Clipping Mask.

Step 17
Now we will be making the Play triangle shape. Using Pen Tool (P) make a white triangle shape like shown in the image bellow and apply the layer styles. Now copy paste the Radial Metal Effect layer above the Play symbol layer and make it a clipping mask. Ok button is ready.

Step 18
Moving to the next and back button. Duplicate the button group, and name it next. Resize it up to 50%, and be sure to delete the first triangle that we did. Duplicate the Play symbol; align them so that the tip of the left one meets the vertical side of the right one. Center them and we have a Next Button. Duplicate this layer, name it Back. Select the two Play symbols, pres Command + T, or CTRL + T, change the value of the width to negative (-) like shown in the preview, center it and we have 3 buttons for our player.

Step 19
Volume Button. Duplicate one of the Next or Back group, name it Volume Button. Delete the Play Symbol layers, create a shape using Pen Tool (P) like the one in the image, apply the same effects as in Step 17, and the Volume Button should be done too.

Step 20
Artist Information Box: Using Rectangle Tool (U) make a rectangle under the player shape, turn the Fill to 12% and apply the layer styles.

Step 21
Create a black square rectangle using Rectangle Tool (U), this will be the thumbnail holder for the album cover. Now using Horizontal Type Tool (T), pick a font and a size, I like Myriad Pro because it is a common and standard font. Insert text that represents the name of the song and apply styles to the text. Repeat the same step for the band and album part, use a smaller font but apply the same styles.

Step 22
Rating Stars. Using #f24e47 as a base color and with Custom Shape Tool (U) from where you will have to select the star shape, make 5 stars, the first 4 should be #f24e47 and the last one pure black #00000. Apply the same style to all 5 and our player is ready for action.

Step 23
CD Shape. Make a new group, name it CD. Using Ellipse Tool (U) make a perfect circle a little smaller than the size of the canvas and set color to #bcb4c3. Using Elliptical Marquee Tool (M) make a small circle in the middle of the big one, right click to Select Inverse, after press the Add Layer Mask button at the bottom of the layer panel.

Step 24
Make a new layer, select Brush Tool (B), set size to 99, hardness to 0 and select the Soft Round Pressure Opacity Brush. Start brushing using the colors suggested in the image bellow. When finished set the Opacity of the layer to 30% and make the layer a Clipping Mask.

Step 25
Apply the following styles to the shape layer.

Step 26
Once again, make a new layer, and start brushing like in the example using the suggested colors. Set the Opacity of the layer to 60% and make it a Clipping Mask.

Step 27
Duplicate the shape layer, and bring it in front of the two Clipping Masks, resize it to 98-96%. Apply only the layer style that you can find in the image below.

Step 28
Making some more effects. Create a new layer above the second circle shape. Use a bigger brush and #9a969d color and make a horizontal line like in the example. Hit Command/CTRL + T, right click and select Skew. Drag the right top corner holding SHIFT until it meets with the other one in the middle. Duplicate the layer 3 times and make a cross. Select the 4 layer, merge them and make the resulting layer a clipping mask.

Step 29
Insert a new layer, and using #f4f4f5 and #e2e2e3 as colors start brushing until you get something similar to the example.

Step 30
Radial Blur Effect. Make a new layer, fill it with any color, follow Step 13, after align the center of the “vortex” with the center of the CD and reduce the Opacity to 10%.

Step 31
Add a new layer, use Brush Tool (B) and start brushing away using the colors and direction in the example. Set the Opacity to 15% and blending mode for the layer to Darker Color.

Step 32
Redo the steps from 28 and 29, and get creative to give a glossy reflection to the CD shape.

Step 33
The basic CD shape is now done.

Step 34
Use Rectangular Tool (U) and make some free shapes like in the example. Select all of them and merge them. Hit Command/CTRL + T, right click and select Skew. Drag the two lower points to the middle. Now go to Filter > Blur > Motion BLur and set the Angle to 0 and the Distance to 11. Move it on the right side of the CD. Duplicate it and apply the style to the layer. Remember to make both layers clipping masks.

Step 35
Make a new circle inside the CD shape using Ellipse Tool (U), set the Fill to 0 and apply the style. Make another one, this time smaller, near the center, drop the Fill to 0 and apply the style to the layer. Add another layer and using Ellipse Tool (U) make a grey circle, use the Elliptical Marquee Tool (M) to make another small one in the center of this one, Select Inverse and add layer mask. Drop the Opacity to 45%.

Step 36
Add a new layer, select Brush Tool (B), pick a smaller brush and using the two colors start brushing away. Drop the Opacity to 25% and transform the layer into a Clipping Mask. Make a new layer now, this one will be even darker than the previous one #424143, use Elliptical Marquee Tool (M) to make a circle a little bit bigger than the initial hole in the CD, make it a layer mask and apply the layer styles to it.

Step 37
Add a new circle using Ellipse Tool (U) and make it small, close to the middle end of the CD. Drop the Fill to 0 and the Opacity to 25% and apply the layer styles. Now add another layer, and using Ellipse Tool (U) make one more circle, exactly the size of the hole in the CD, drop the fill to 0 and apply the last layer style to it. Our CD is done, now to move to the Vinyl Disk version of the player.

Step 38
Create a new group and name it Vinyl Disk. Make a black #00000 circle using Ellipse Tool (U) almost as big as the canvas. After using Elliptical Marquee Tool (M) make a whole in the vinyl using the layer mask function that we’ve been doing. Apply the layer styles from the example.

Step 39
Duplicate that existing layer and reduce its size to 98%. After make a new layer. Fill it with black #00000 add some noise to it and radial blur, center the vortex in the middle of the disk.

Step 40
Add a new layer, go to Filter > Render > Clouds after go to Filter > Blur > Radial Blur and set the Amount to 100. Blur Method to Zoom and Quality to Best. Set the blending mode for the layer to Soft Light. Using Brush Tool (B) and #fffff (white) make a horizontal stroke crossing the disk. Command/Ctrl + T, right click to select Perspective than while holding the top left corner drag it down until the diagonals intersect in the middle. Set the blending mode of the layer to Soft light and we’re done. Duplicate it as many times as you like, I used only 3 copies, and change the position to give that reflection effect.

Step 41
Make a new circle but this time to 95% of the vinyl’s size. Drop the Fill to 0 and apply the layer style. Duplicate it many times, by dropping the layer size once you get closer to the center.

Step 42
In this step we will make another circle, this time using #ff0000, make it a little bigger than the whole in the disk, use Elliptical Marquee Tool (M) and make a small hole in the circle with the help of a layer mask, insert the Canvas Texture (this can be downloaded from the link in Tutorial Assets) transform the layer into a Clipping Mask, set the blending mode of thee layer to Multiply and it’s done.

Step 43
Make a small circle exactly the size of the hole we just did in the red canvas one, reduce the Fill to 0 and apply the layer style. Now make another one, this time bigger, almost as big as the red circle, drop the Fill to 0 and apply the layer style.

Step 44
In this step we will create the player arm. Make a new group, name it Player Arm. Using Ellipse Tool (U) make a black #000000 circle like the one in the example. Select Pen Tool (P) and select Paths from the upper menu. Draw a shape like the one I did in the example, right click it, select Make Selection and press the Add Layer Mask button.

Step 45
Add a new layer, use Brush Tool (B) and make a white #ffffff dot at the top of the circle, right click the layer and make it a Clipping Mask, set the blending mode of the layer to Soft Light. Now make another layer, fill it with any color, go to Filter > Noise > Add noise and raise the Amount to 400%, Distribution to Gaussian and check the Monochromatic box, after set the blending mode of the layer to Color Dodge, the Opacity to 15% and Fill to 50%.

Step 46
Make a new circle like the one in the example, fill it with #353535, add another layer on top of it use brush Tool (B) to make a black #000000 stroke on the right side of the circle. Transform the layer in a Clipping Mask. Duplicate the circle shape and move it a few pixels up in the right top direction and apply the layer styles.

Step 47
Add a new layer, and using Brush Tool (B) make a white #ffffff dot on the top left side. Make the layer a Clipping Mask and set the blending mode of the layer to Soft Light. Now duplicate the noise layer that we did in Step 45 and bring it on top of the white dot we just did, obviously making it a Clipping Mask too.

Step 48
Using Pen Tool (P) draw a shape like in the example, fill it with black #000000 and go to Filter > Blur > Gaussian Blur, set the radius to 2, 5 pixels. Once again with the help of Pen Tool (O) make another shape with round corners like the one in the example, fill it with #464141 and apply the layer style.

Step 49
Make a white #ffffff shape this time using Pen Tool, but a little shorter than the previous one, go to Filter > Blur > Gaussian Blur and set the radius to 2, 5. Make a small rectangle at the end of the arm, apply the layer style. Now using Pen Tool (P) make a shame like the one in the example and fill it with black #000000. Now we will work on two layers, the first one will have just a white #ffffff small stroke at the tip and the Opacity set to 10% and the second layer will have 2 strokes and the Opacity set to 15%. Both will have to be Clipping Masks.

Step 50
Duplicate the shape we just did using Pen Tool (P) and move it a few pixels up. Apply the layer style. Duplicate the white #ffffff stroke we did in the beginning of Step 49, position it like in the example. Now holding the ALT key pressed down, select the Vector Mask thumbnail of the layer below and drag it to this one. This will copy the vector shape and "trap" the stroke inside of it.

Step 51
Make a new group, name it Screw. Inside using Ellipse Tool (U) make a small circle and apply the layer styles. Use Rectangular Tool (U) to make a small black #000000 rectangle. Duplicate the group and move it down a little, so it looks like two screws are keeping the shapes together.

Step 52
This is the last audio format shape, the Cassette tape. Using the Rounded Rectangle Tool (U), set the radius to 10 pixels, the Fill to 65% and the color to #4e4e4e and make a shape like the one in the example. Apply layer styles. The Pattern can be found in the Pattern archive from Tutorial Assets.

Step 53
In this step we will add some details to the cassette. Using Pen Tool (P) set the color to #8c8c8c and make a shape similar to mine on the right side. Drop the Opacity to 45% and duplicate this layer mirroring it to the other side of the cassette. Pen Tool (P) will help this time to make two more details to the cassette, using #323232 and #5b5b5b as body colors draw two shapes like in the example. To the last shape reduce the Opacity to 80%. Now with the help of Ellipse Tool (U) and Rounded Rectangular Tool (U) make 4 white #ffffff shape like in the example. The last detail that we are adding in this step is a small black #000000 rectangle made using Rectangle Tool (U) and dropping the layers Opacity to 75%.

Step 54
Using Ellipse Tool (U) and Rectangular Tool (U) add some more details like in the example. After you’ve finished the work on the small details we are going to add the tape line. For this we will need to use Pen Tool (P) and set it to Paths. Make a path like in the example than set your brush to 1 pixel size and 0 hardness, fill color to #000000 and right click anywhere in the canvas to select Stroke Path.

Step 55
Adding the Screws. Make a new group and name it Screw. Make a small black #000000 circle in the inferior right corner like in the example and set it’s Opacity to 45%. Over this one make another circle this time 80% smaller and using white #ffffff while dropping the Opacity to 75%. Apply the layer styles to the white circle shape.

Step 56
Using a small black #000000 brush make some strokes on the top and lower part of the screw. Right click on the layer to make it a Clipping mask and drop the Opacity to 75%. Now select Horizontal Type Tool (T) and using Arial as a font, the size to 4, 5pt and the font style to Black make a + in the middle of the circle. Now apply the layer style. After everything is done, copy paste the group name Screw in one of the indicate areas in the example.

Step 57
Add a new group and name it tape. Make a brown #343732 circle and using Pen Tool (P) set to Paths make a path like the one in the example. Right click on the canvas and press Select Inverse than pres the Add layer mask button. Make a new layer over the tape shape and add a new circle, this time a white one #ffffff, transform it in to a Clipping Mask and drop the Opacity to 55%. Using Pen Tool (P) set to Paths make another selection like in the example and using a black #000000 brush, fill the inside of the selection until the grey is totally masked.

Step 58
Using Ellipse Tool (U) add a new circle but this time set the color to #aaaaaa. Make another circle using Elliptical Marquee Tool (M) and add another layer mask. Drop the Opacity to 55%. With the help of Ellipse Tool (U) make another small circle and set the Opacity to 55% than apply layer styles.

Step 59
In this step we will add the dots to the tape roll. Using Ellipse Tool (U) make a small circle like in the example, using #737373 than duplicate it until you get the same result like in the example. Now using Pen Tool (P) set to Shape layers and the color set to #9a5f5f make two shapes like in the example. Our tape roll is now done. Duplicate the group and you can rotate it as you want for a dynamic effect of the rolls.

Step 60
This last step will help make the stickers. Using Pen Tool (P) make a shape like the one in the example, after make a rectangular shape using Rectangular Marquee Tool (M) and add a layer mask after you’ve inversed the selection. Apply the layer styles. Now make two shape using Rectangle Tool (U) one colored white #ffffff and the other one #f24e47. Make the layers Clipping Masks and apply the layer style to both of them.

Final Image
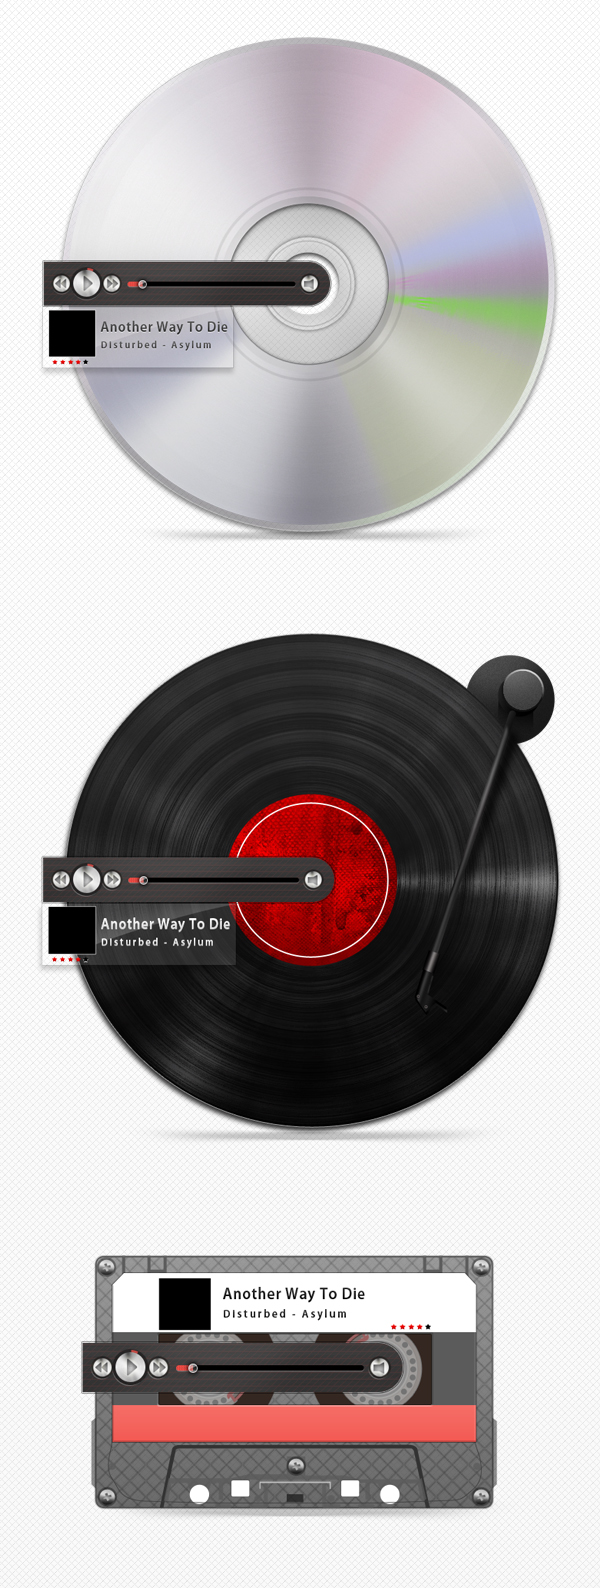
copied from http://psd.tutsplus.com
No comments:
Post a Comment