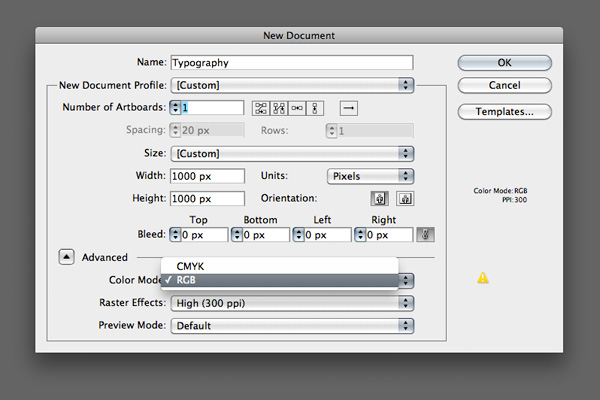
All kinds of Photoshop, Illustrator, Fireworks and Other Designs, Tips, Tricks & Tutorials
Like On Facebook
.::.::Search::.::.
Labels
Tuesday, November 29, 2011
Create a cool Detailed Vintage Typography with Illustrator and Photoshop
Before We Begin
Before we start this tutorial, It’s important to have a bit knowledge and experience in Adobe Illustrator. Why are we using Illustrator? Because it offers great possibilities to customize any typeface, achieving excellent results and obtaining smooth curves, borders and shapes in a high quality vector file. Also, it’s recommened take the advantages of a graphic tablet. It doesn’t have to be a big one, I work with an A6 Wacom Tablet and It works perfectly for every technique described on this tutorial. Let’s go!
Step 1
First, open Adobe Illustrator and create a new document 1000x1000px, RGB, 300ppi.
Step 2
By selecting the Type Tool (T), we will select the font for our text. In this artwork, I used a free typeface called “Creampuff” (you can find a link on the assets description).
This was a tribute artwork to the soul singer Solomon Burke, so I typed “Solomon Burke” on my canvas. For a better view, I wrote my text in small and capital letters to select the most aesthetical for our composition.
Labels:
Abstract,
Adobe,
Background,
CS3,
CS4,
CS5,
Design,
Designs,
Effects,
Free,
Illustrator,
Photoshop,
Text Effects,
Tips,
Tricks,
Tutorials
Sunday, November 27, 2011
How to create an Cool Impressive New Year 2012 card with Cool Neon text in Photoshop CS5
If you want to learn how to create an impressive card for the holiday, then we have an awesome tutorial for you. I’m going to show you how use brushes and Layer styles in Photoshop CS5 to create eye catching digital illustration with neon text effect. Layered PSD file included. Let’s get started!
Final Image Preview
Start working by creating a new document (Ctrl+N) in Adobe Photoshop with the size 1900px by 1200px (RGBcolor mode) at a resolution of 300 pixels/inch. Select the background layer in Layers panel and click on Add a layer style icon from bottom part of the Layers panel to select Gradient Overlay.
Designing Cool Text And Customizing Cool Background In Photoshop
Monday, November 14, 2011
Reader Tutorial: Flaming Car in Photoshop
This week’s tutorial we will show you how to create a flaming car. We saw this effect before and it’s quite simple but it’s a good exercise and the result is quite good. You can also apply this effect on other images.
So let’s do that.
Step 1
Open Photoshop and create a new document. Make the background with a mix of black and red (#160000). Then with the image of a car with no background. For this first step the idea is get the outlines of the car for our image. To do that, it's pretty easy. Create a new layer by duplicating the car's layer. Rename it to "Base" and hide the original. Go to Image>Adjustments>Invert.
After that go to Filter>Stylize>Find Edges. Repeat the same thing again in order to have another layer but for the Blend Mode use Hard Light. After that you can merge those 2 layers into one.
Awesome Light Effects in Fireworks
STEP 1 - THE O
To start up, just create a simple white circle in the middle of the canvas.
STEP 2 - RADIAL GRADIENT
Now set a radial gradient for the circle. Use the color #000 for the center and #FFF for the borders. Note that we move the black color near to the white. Also use an opacity of 55%.
Subscribe to:
Posts (Atom)